Quickstart Guide meloki
Before you begin, it is crucial to read and follow all safety instructions. Ensuring your safety and the proper operation of this equipment is our top priority. Please take a moment to familiarize yourself with the safety guidelines provided. Your adherence to these instructions will help prevent accidents and ensure a smooth and efficient setup.
General Information
meloki is a local AI instance specifically designed for customers, providing easy access to powerful AI solutions. This guide outlines the essential steps to quickly set up and start using your meloki system.
The meloki software and AI solutions are installed on the primary NVMe drive. An additional SSD drive is available. It is used for Backups, you may also use it to store any Input or Output Data (RAG Files, Audio Files or your own models)
Initial Appliance Setup
- Unpack the appliance.
- Install or mount the appliance.
- Connect the appliance to the network.
- Choose one of the available methods to access the system and perform the initial network configuration.
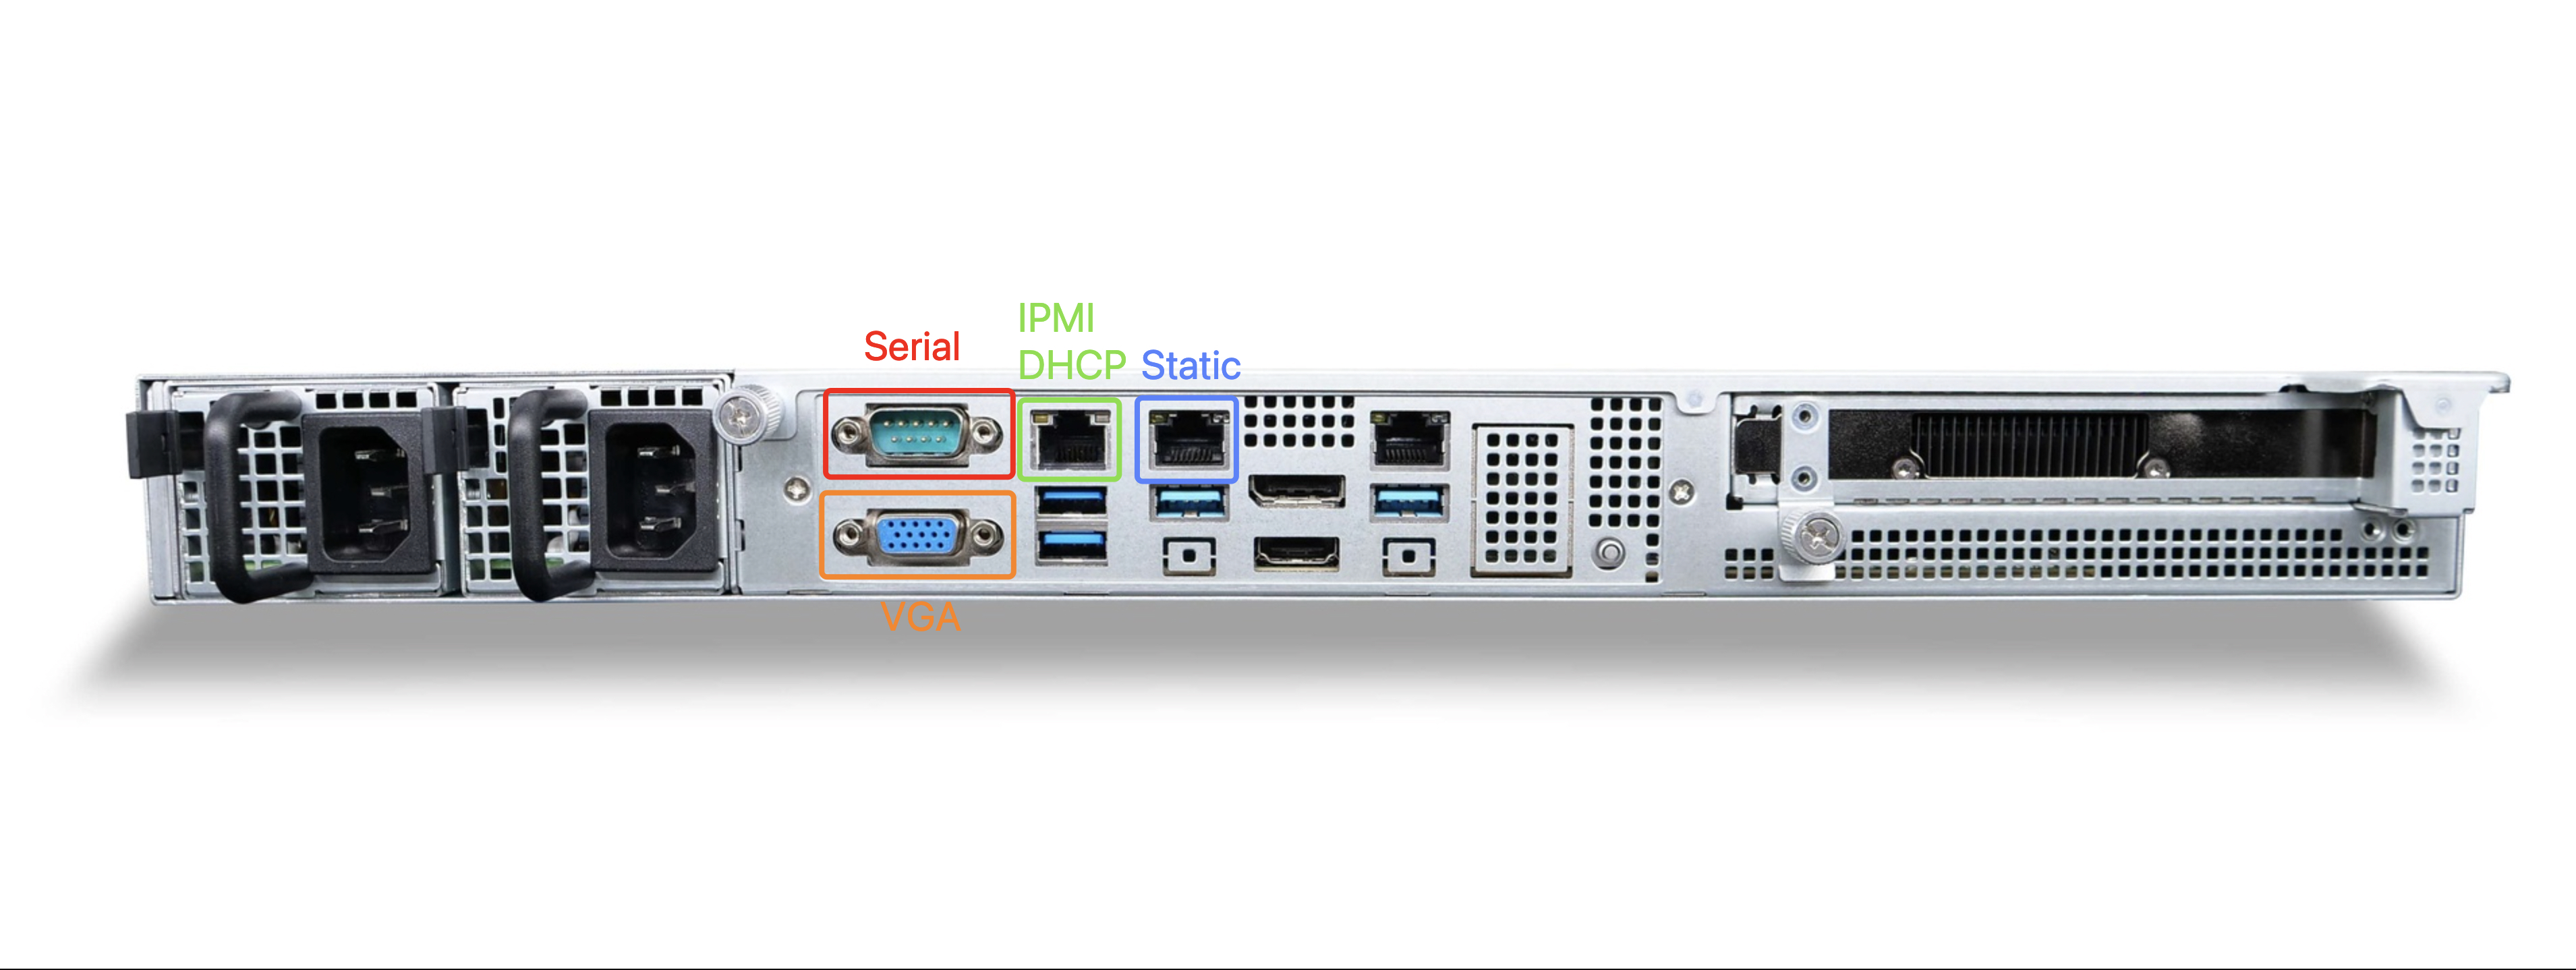
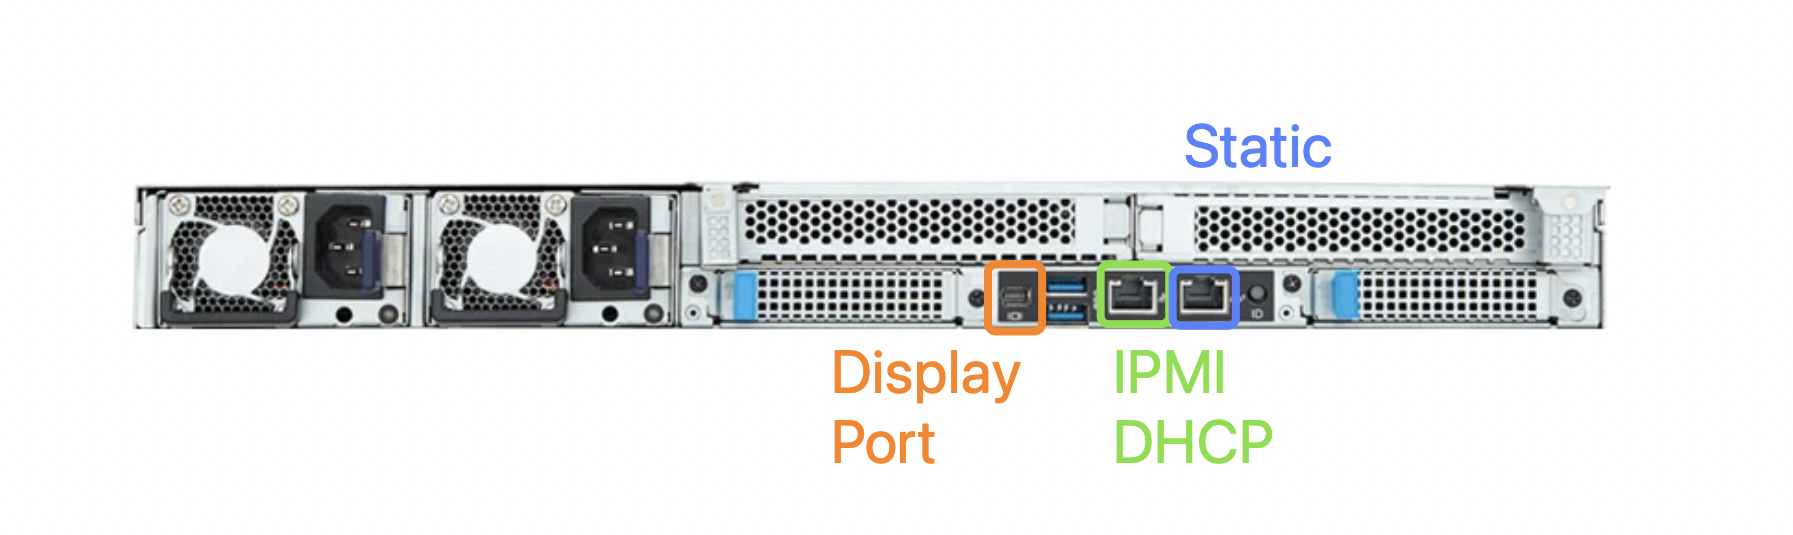
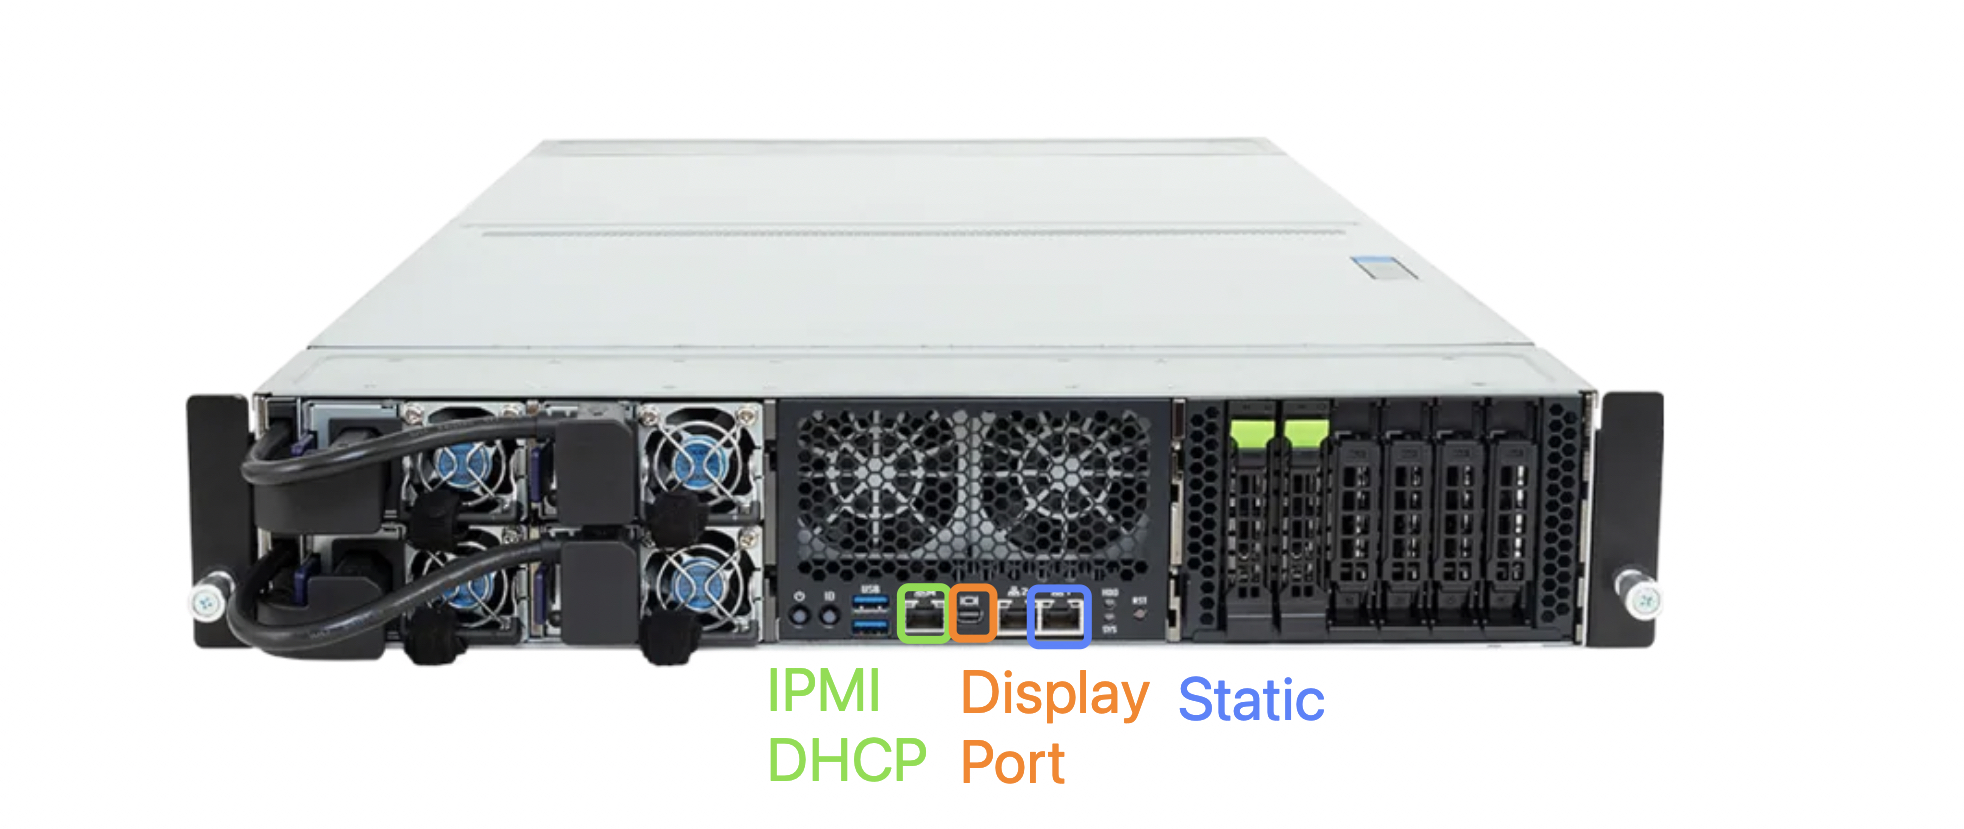
By default, all appliances are reachable via Port 1 using the static IP address 192.168.2.1.
Available Access Methods
| Access Method | scope7-4480 | scope7-5580 | scope7-6680 |
|---|---|---|---|
| Direct Network Access | ✓ | ✓ | ✓ |
| IPMI Web Interface | ✓ | ✓ | ✓ |
| VGA Console | ✓ | ✓ (with adapter) | — |
| Mini DisplayPort Console | — | ✓ | ✓ |
| Serial Console | ✓ | — | — |
scope7-4480 Port guideline
scope7-5580 Port guideline
scope7-6680 Port guideline
Method 1: Direct Network Access
All appliances are shipped with Port 1 configured with the static IP address:
192.168.2.1
Ensure that your workstation can reach the network 192.168.2.0/24 and open the following URL in your browser:
https://192.168.2.1:10000
In addition to accessing the DOMOS WebUI, you can also connect to the appliance via SSH:
ssh admin@192.168.2.1
If the appliance is not reachable via the default IP address, configure a network address using the DomosNetConf utility.
Method 2: Access via IPMI
All appliances provide an IPMI interface that allows access to the system independently of the operating system configuration.
Requirements
- Connect a network cable to the dedicated IPMI port.
- The IPMI interface obtains its IP address via DHCP.
- During the boot process, the assigned IP address is displayed on the screen.
Open the following URL in your browser:
https://<IPMI-IP-ADDRESS>
Always use HTTPS when accessing the IPMI Web Interface.
Login to the IPMI Web Interface
Use the following default credentials to log in to the IPMI Web Interface:
| Username | Password |
|---|---|
| admin | secudos-meloki |
Open the Remote Console
The procedure differs depending on the appliance model.
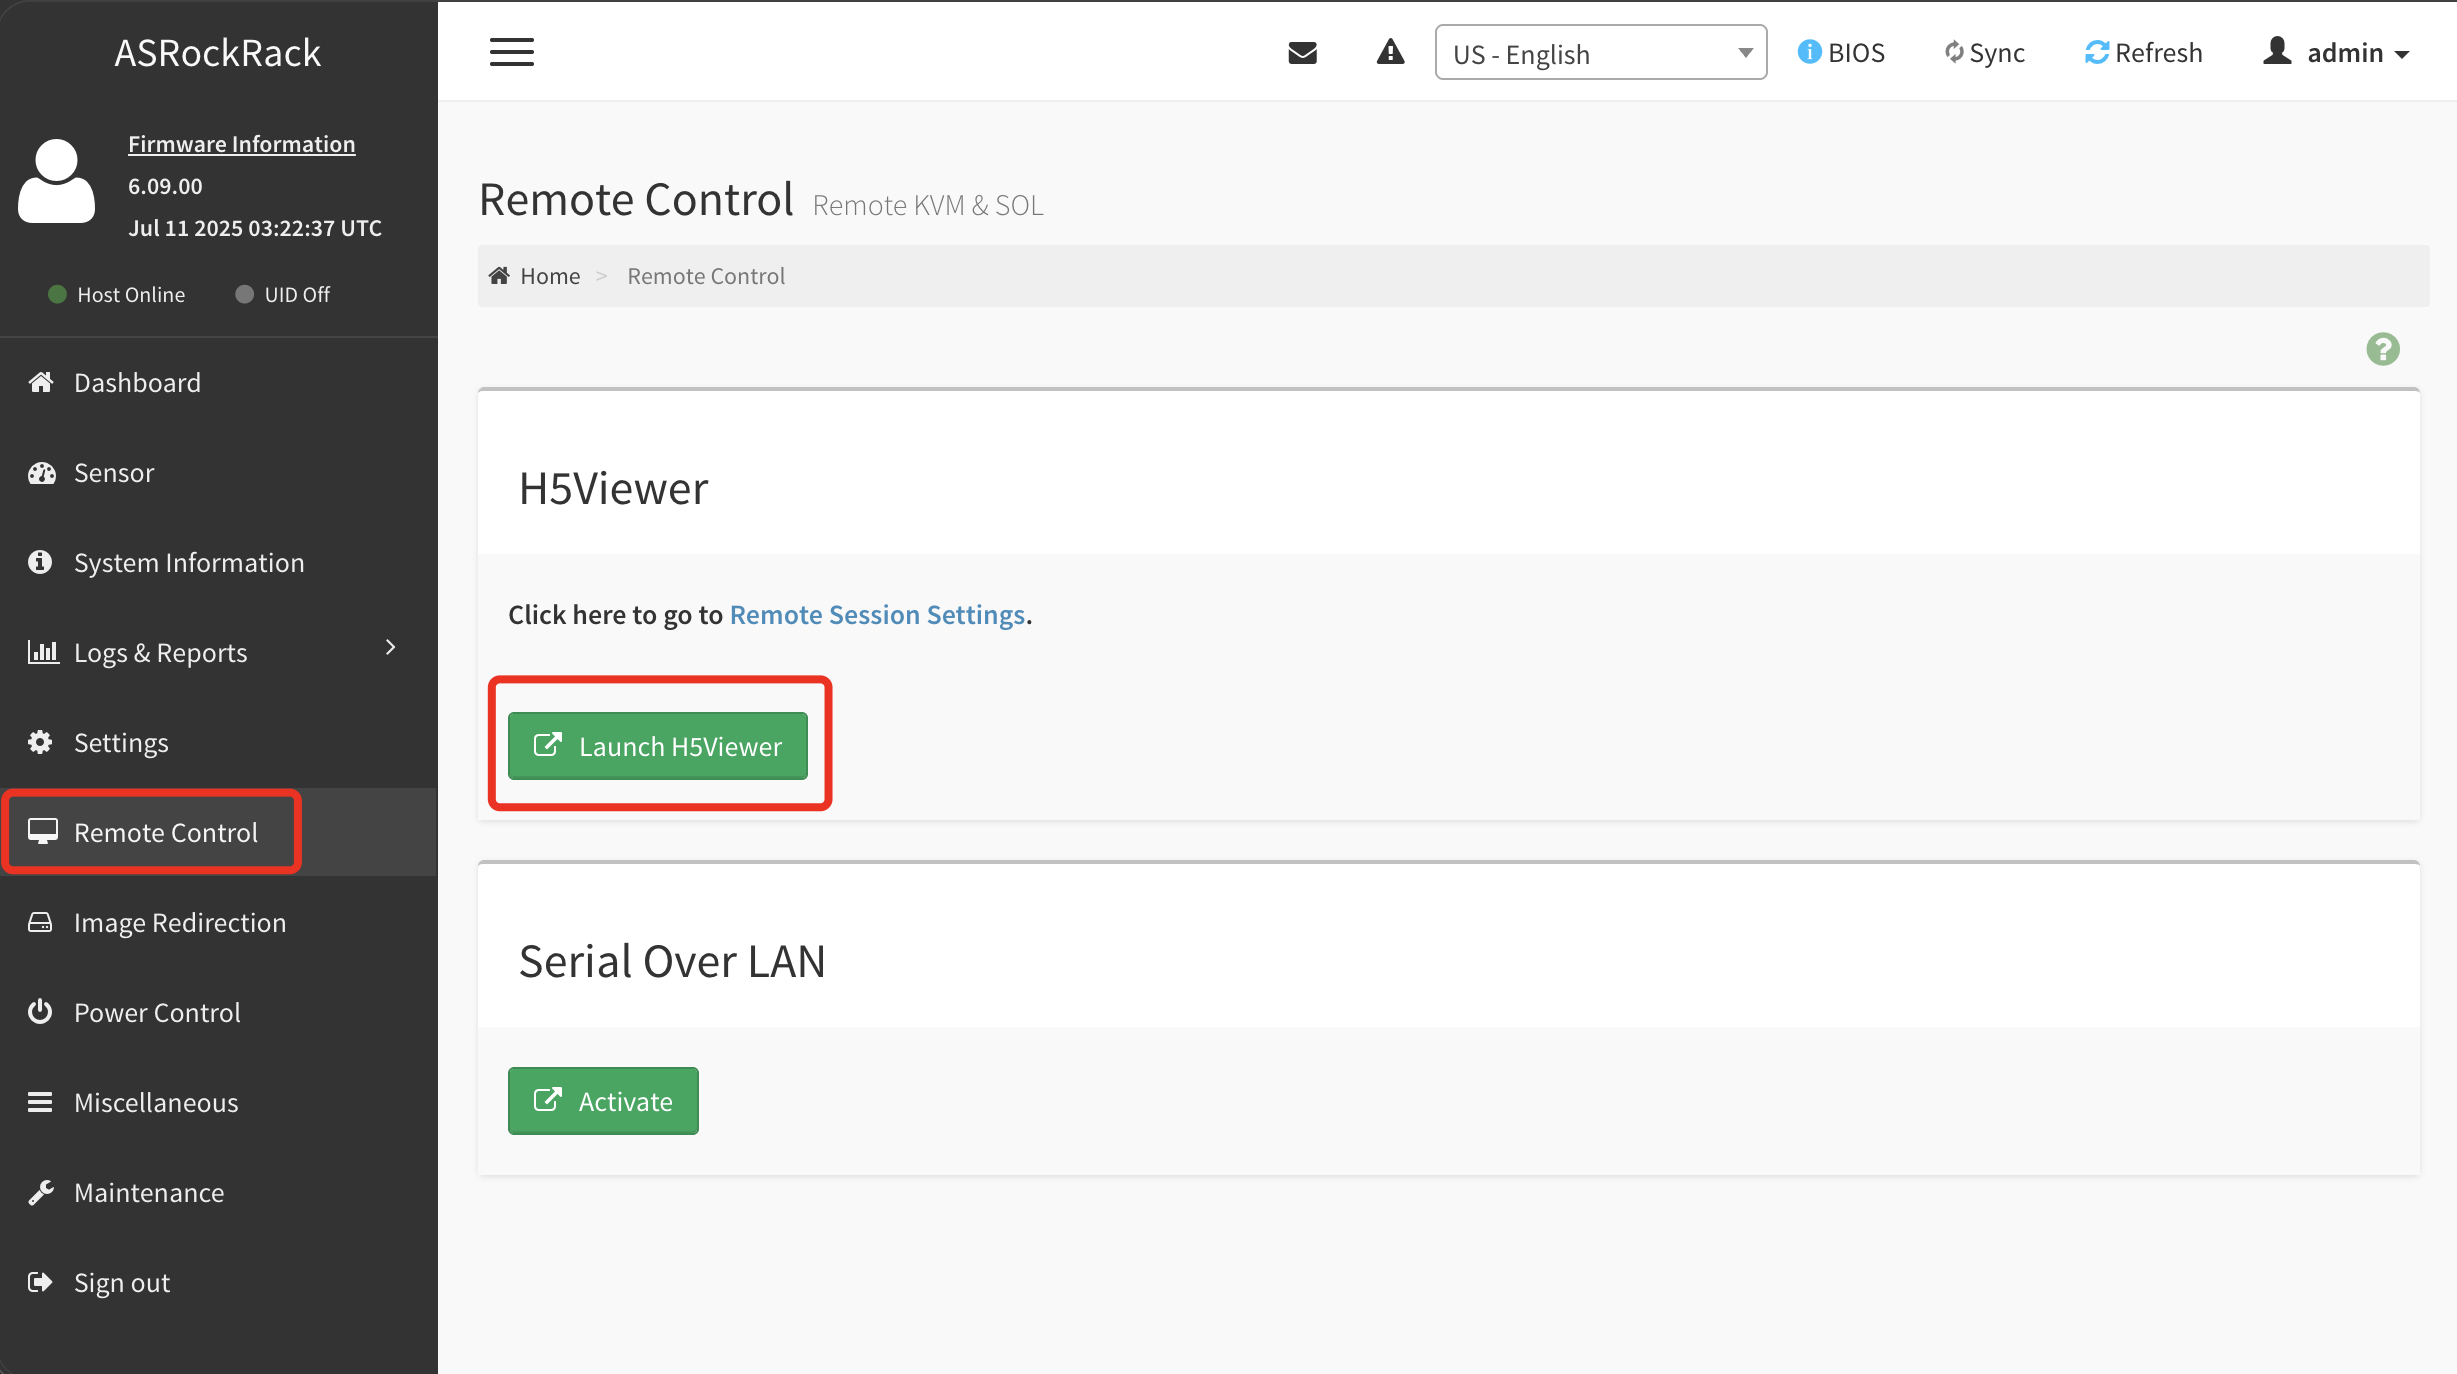
scope7-4480
- Navigate to Remote Control.
- Select H5Viewer.
- Click Launch H5Viewer.
scope7-5580 and scope7-6680
- Navigate to Remote Control.
- Select H5Viewer.
- Click Launch H5Viewer.
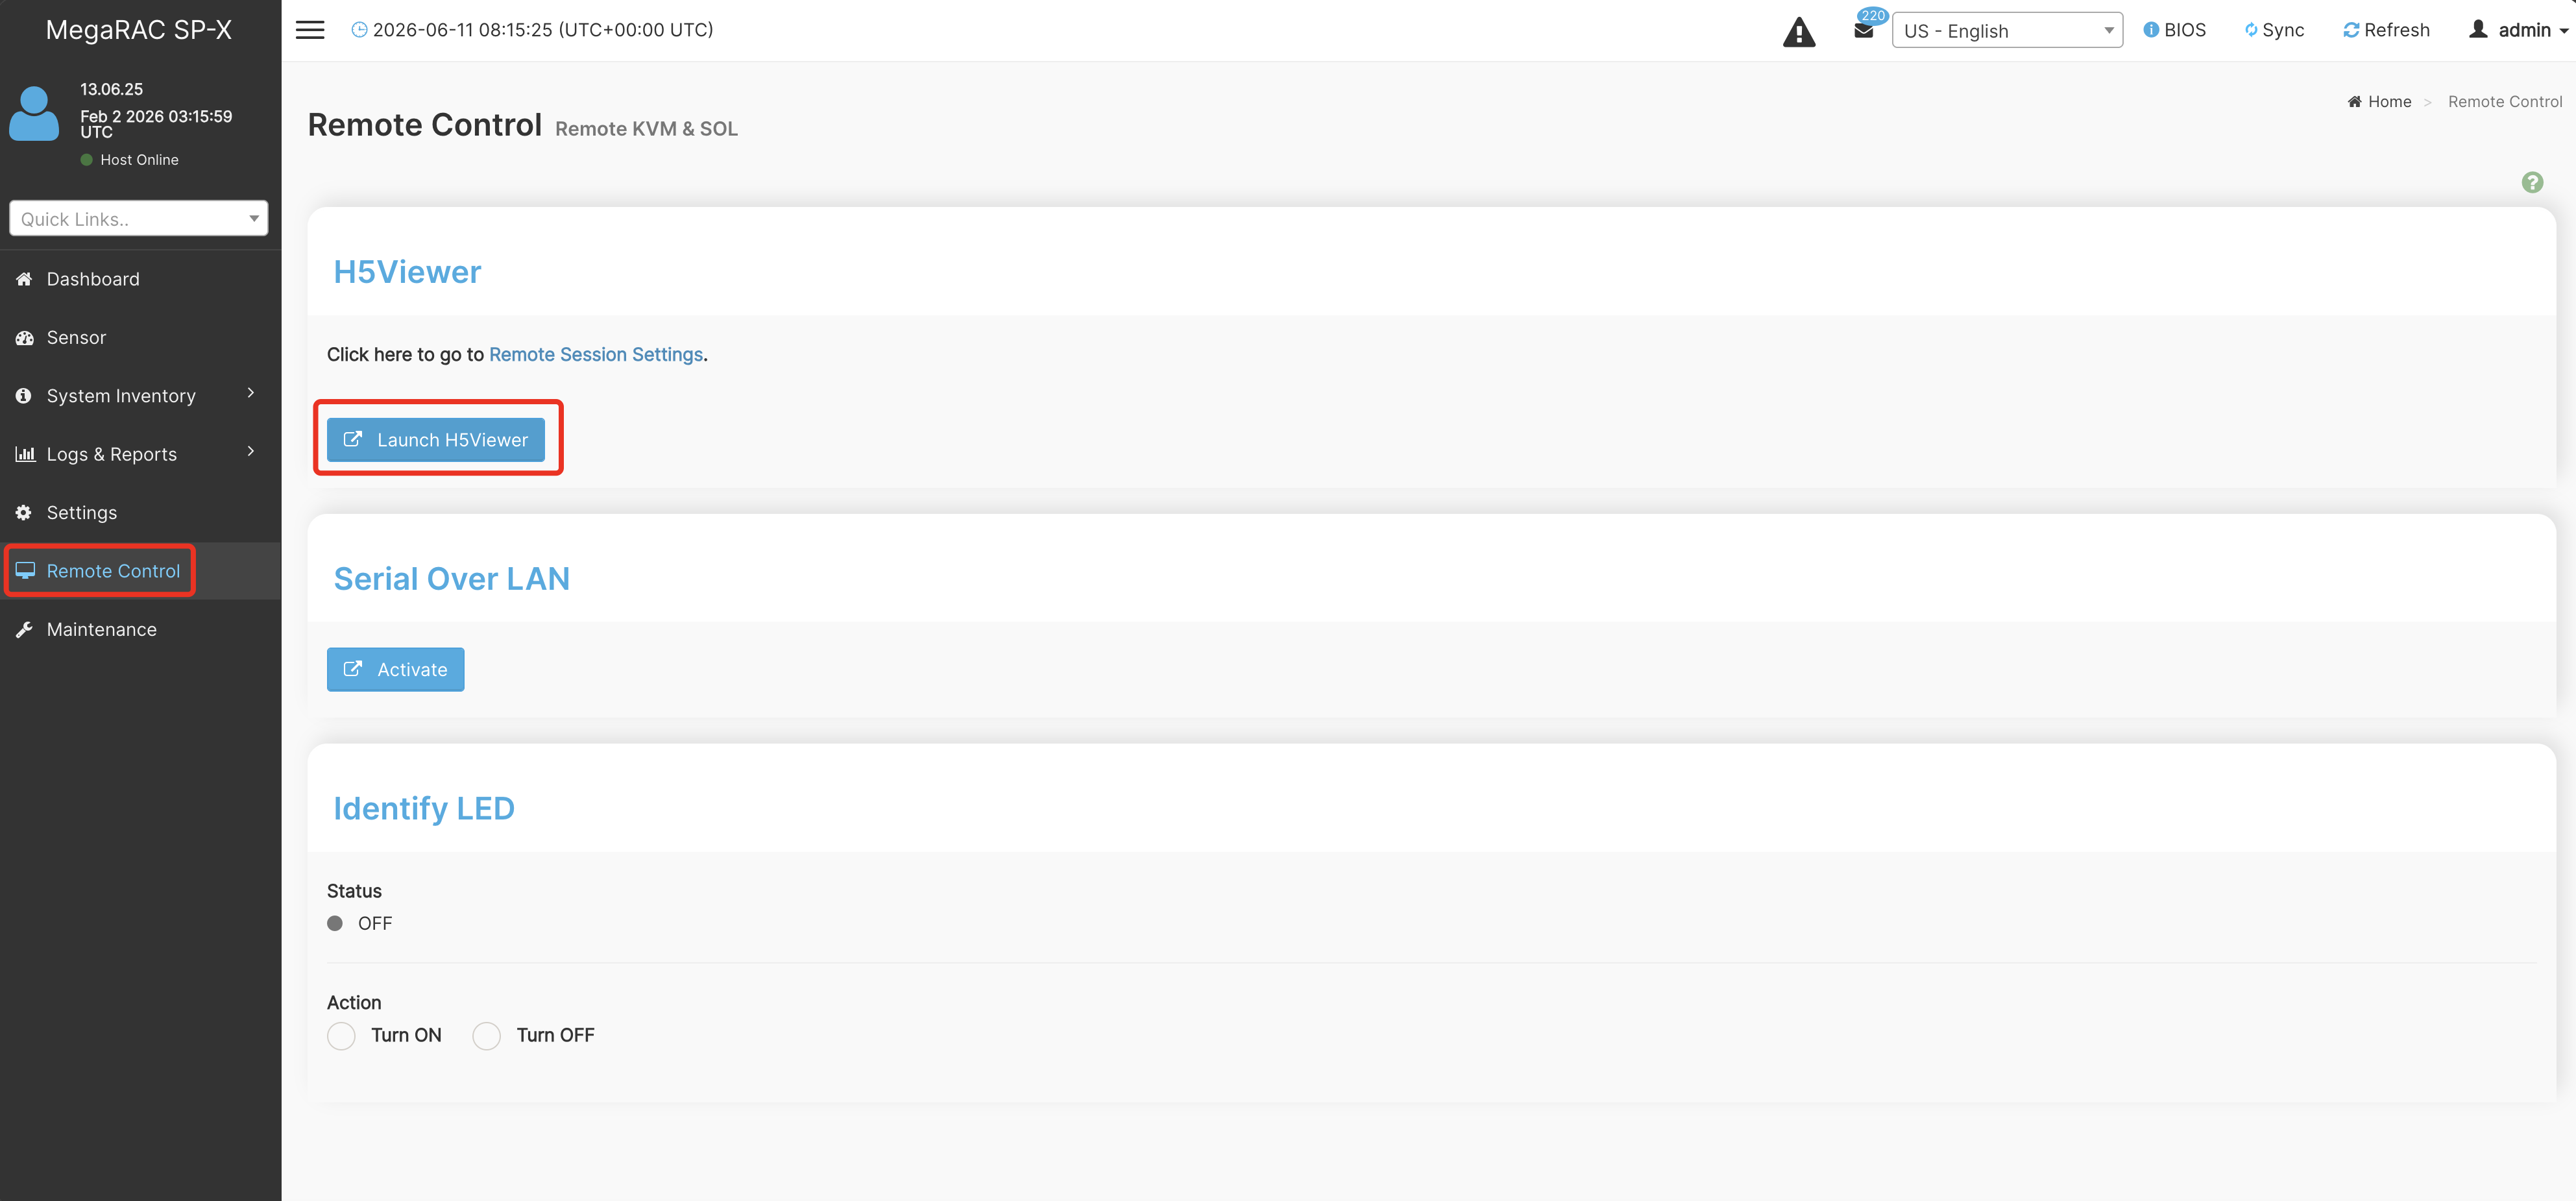
The remote console will open in a new browser window and display the appliance's monitor output.
Log in using the credentials listed in the Default Console Credentials section and continue with the DomosNetConf utility.
Method 3: Access via Serial or Local Console
If network access is not available, the appliance can be accessed directly through a local console.
scope7-4480
The scope7-4480 provides the following local access methods:
- Serial Console
- VGA
scope7-5580 and scope7-6680
The scope7-5580 and scope7-6680 provide local console access via:
- Mini DisplayPort
The scope7-5580 additionally ships with a Mini DisplayPort to VGA adapter for connecting legacy VGA monitors.
Login
Connect a monitor or serial terminal and log in using the credentials listed in the Default Console Credentials section.
After login, continue with the DomosNetConf utility.
Serial Console Settings (scope7-4480 only)
| Setting | Value |
|---|---|
| Speed | 115200 bps |
| Parity | None |
| Data Bits | 8 |
| Stop Bits | 1 |
These settings are commonly referred to as 115200, 8N1 and are often preconfigured in terminal applications.
Default Console Credentials
Use the following credentials when accessing the appliance via IPMI remote console, serial console, or local console:
| Username | Password |
|---|---|
| root | secudos |
The default credentials should be changed after the initial setup.
DomosNetConf
DomosNetConf is a console-based network configuration utility used during the initial appliance setup.
The utility allows you to configure:
- IP address
- Subnet mask
- Default gateway
- DNS servers
To start the utility, execute:
DomosNetConf
Follow the on-screen instructions to configure the desired network settings.
Once network connectivity has been established, all settings can also be modified through the DOMOS WebUI.
Network Requirements
This section lists all outbound network connections required for appliance operation, updates, and optional features.
All connections are outbound connections initiated by the appliance. No inbound firewall rules are required unless explicitly stated otherwise.
General
The following destinations are required for system updates and repository access.
| URL | Port | Protocol | Purpose | Optional |
|---|---|---|---|---|
| domosrepo3.secudos.de | 443 | HTTPS | DOMOS update repository check and download | No |
| secudos.de | 443 | HTTPS | SECUDOS mirror list retrieval | No |
Chat & RAG
The following destinations are required when using the Chat & RAG feature set.
| URL | Port | Protocol | Purpose | Optional |
|---|---|---|---|---|
| registry-1.docker.io | 443 | HTTPS | Docker Hub API and authentication (pulling nginx and Ollama images) | No |
| auth.docker.io | 443 | HTTPS | Docker Hub authentication service | No |
| production.cloudflare.docker.com | 443 | HTTPS | Docker Hub registry storage CDN | No |
| ghcr.io | 443 | HTTPS | GitHub Container Registry (pulling OpenWebUI images) | No |
| pkg-containers.githubusercontent.com | 443 | HTTPS | GitHub Container Registry storage CDN | No |
| registry.ollama.ai | 443 | HTTPS | Ollama model registry API | No |
| ollama.com | 443 | HTTPS | Ollama model library and download redirects | No |
| *.cloudfront.net | 443 | HTTPS | Ollama model download CDN | No |
| huggingface.co | 443 | HTTPS | Hugging Face model hub (embedding and pipeline models) | Yes |
| *.huggingface.co | 443 | HTTPS | Hugging Face API endpoints | Yes |
| cdn-lfs.huggingface.co | 443 | HTTPS | Hugging Face Large File Storage CDN | Yes |
Hugging Face connectivity is only required when using document upload, embeddings, RAG functionality, or custom model workflows.
AI Automation
The following destinations are required when using the AI Automation feature based on n8n.
| URL | Port | Protocol | Purpose | Optional |
|---|---|---|---|---|
| docker.n8n.io | 443 | HTTPS | Official n8n container image repository | No |
| registry-1.docker.io | 443 | HTTPS | Docker Hub API and authentication | No |
| auth.docker.io | 443 | HTTPS | Docker Hub authentication service | No |
| production.cloudflare.docker.com | 443 | HTTPS | Docker Hub registry storage CDN | No |
Accessing meloki
meloki’s WebUI is accessible over HTTPS only.
On First Setup:
https://IP-OF-YOUR-APPLIANCE/
After Setup:
https://IP-OF-YOUR-APPLIANCE/meloki
Or use your FQDN with your own SSL cert.
Configure DOMOS
Configuration via SSH
Use the following SSH commands to connect:
ssh admin@IP-OF-YOUR-APPLIANCE
Password is admin.
You can change the IP address of the system at any time using the DomosNetConf tool from the system command line.
Configuration in DOMOS WEB-UI
Open your preferred browser and log in to DOMOS by entering the default IP address 192.168.2.1:10000 or your customized IP address.
Log in using the default credentials:
Username: admin
Password: admin
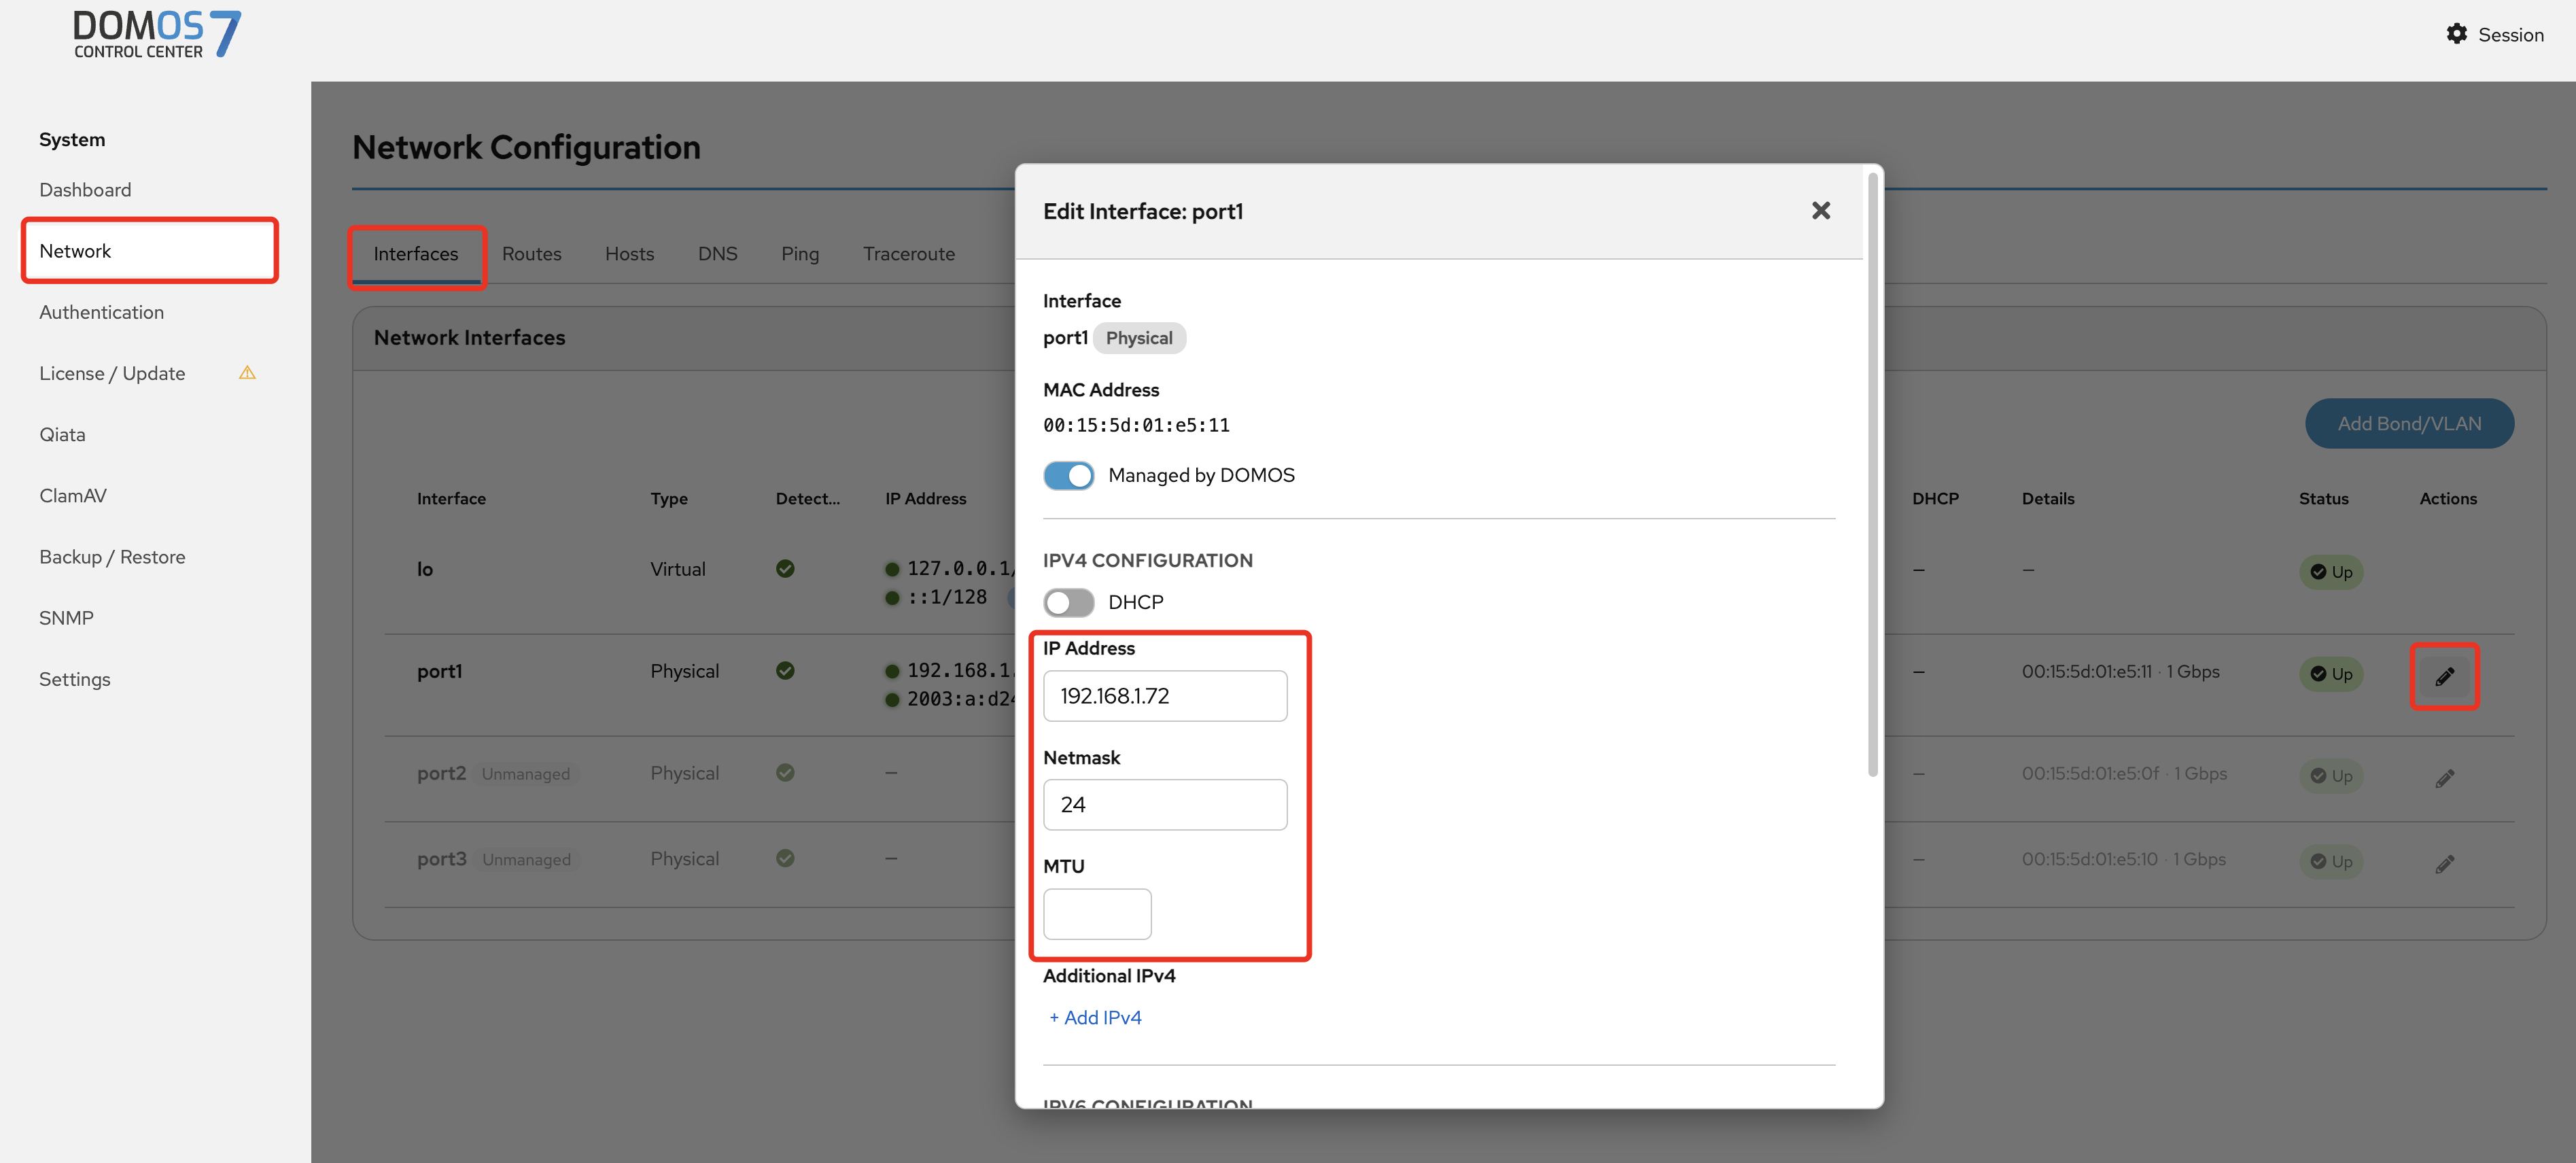
During the initial DOMOS configuration, you must configure both an IP address and a default gateway.
Change IP Address
- In the navigation bar, select "Network" → "Interfaces" and click "Edit" on the desired interface. [OPTIONAL]
- Configure the required network settings and click on "Save".
Set Default Gateway
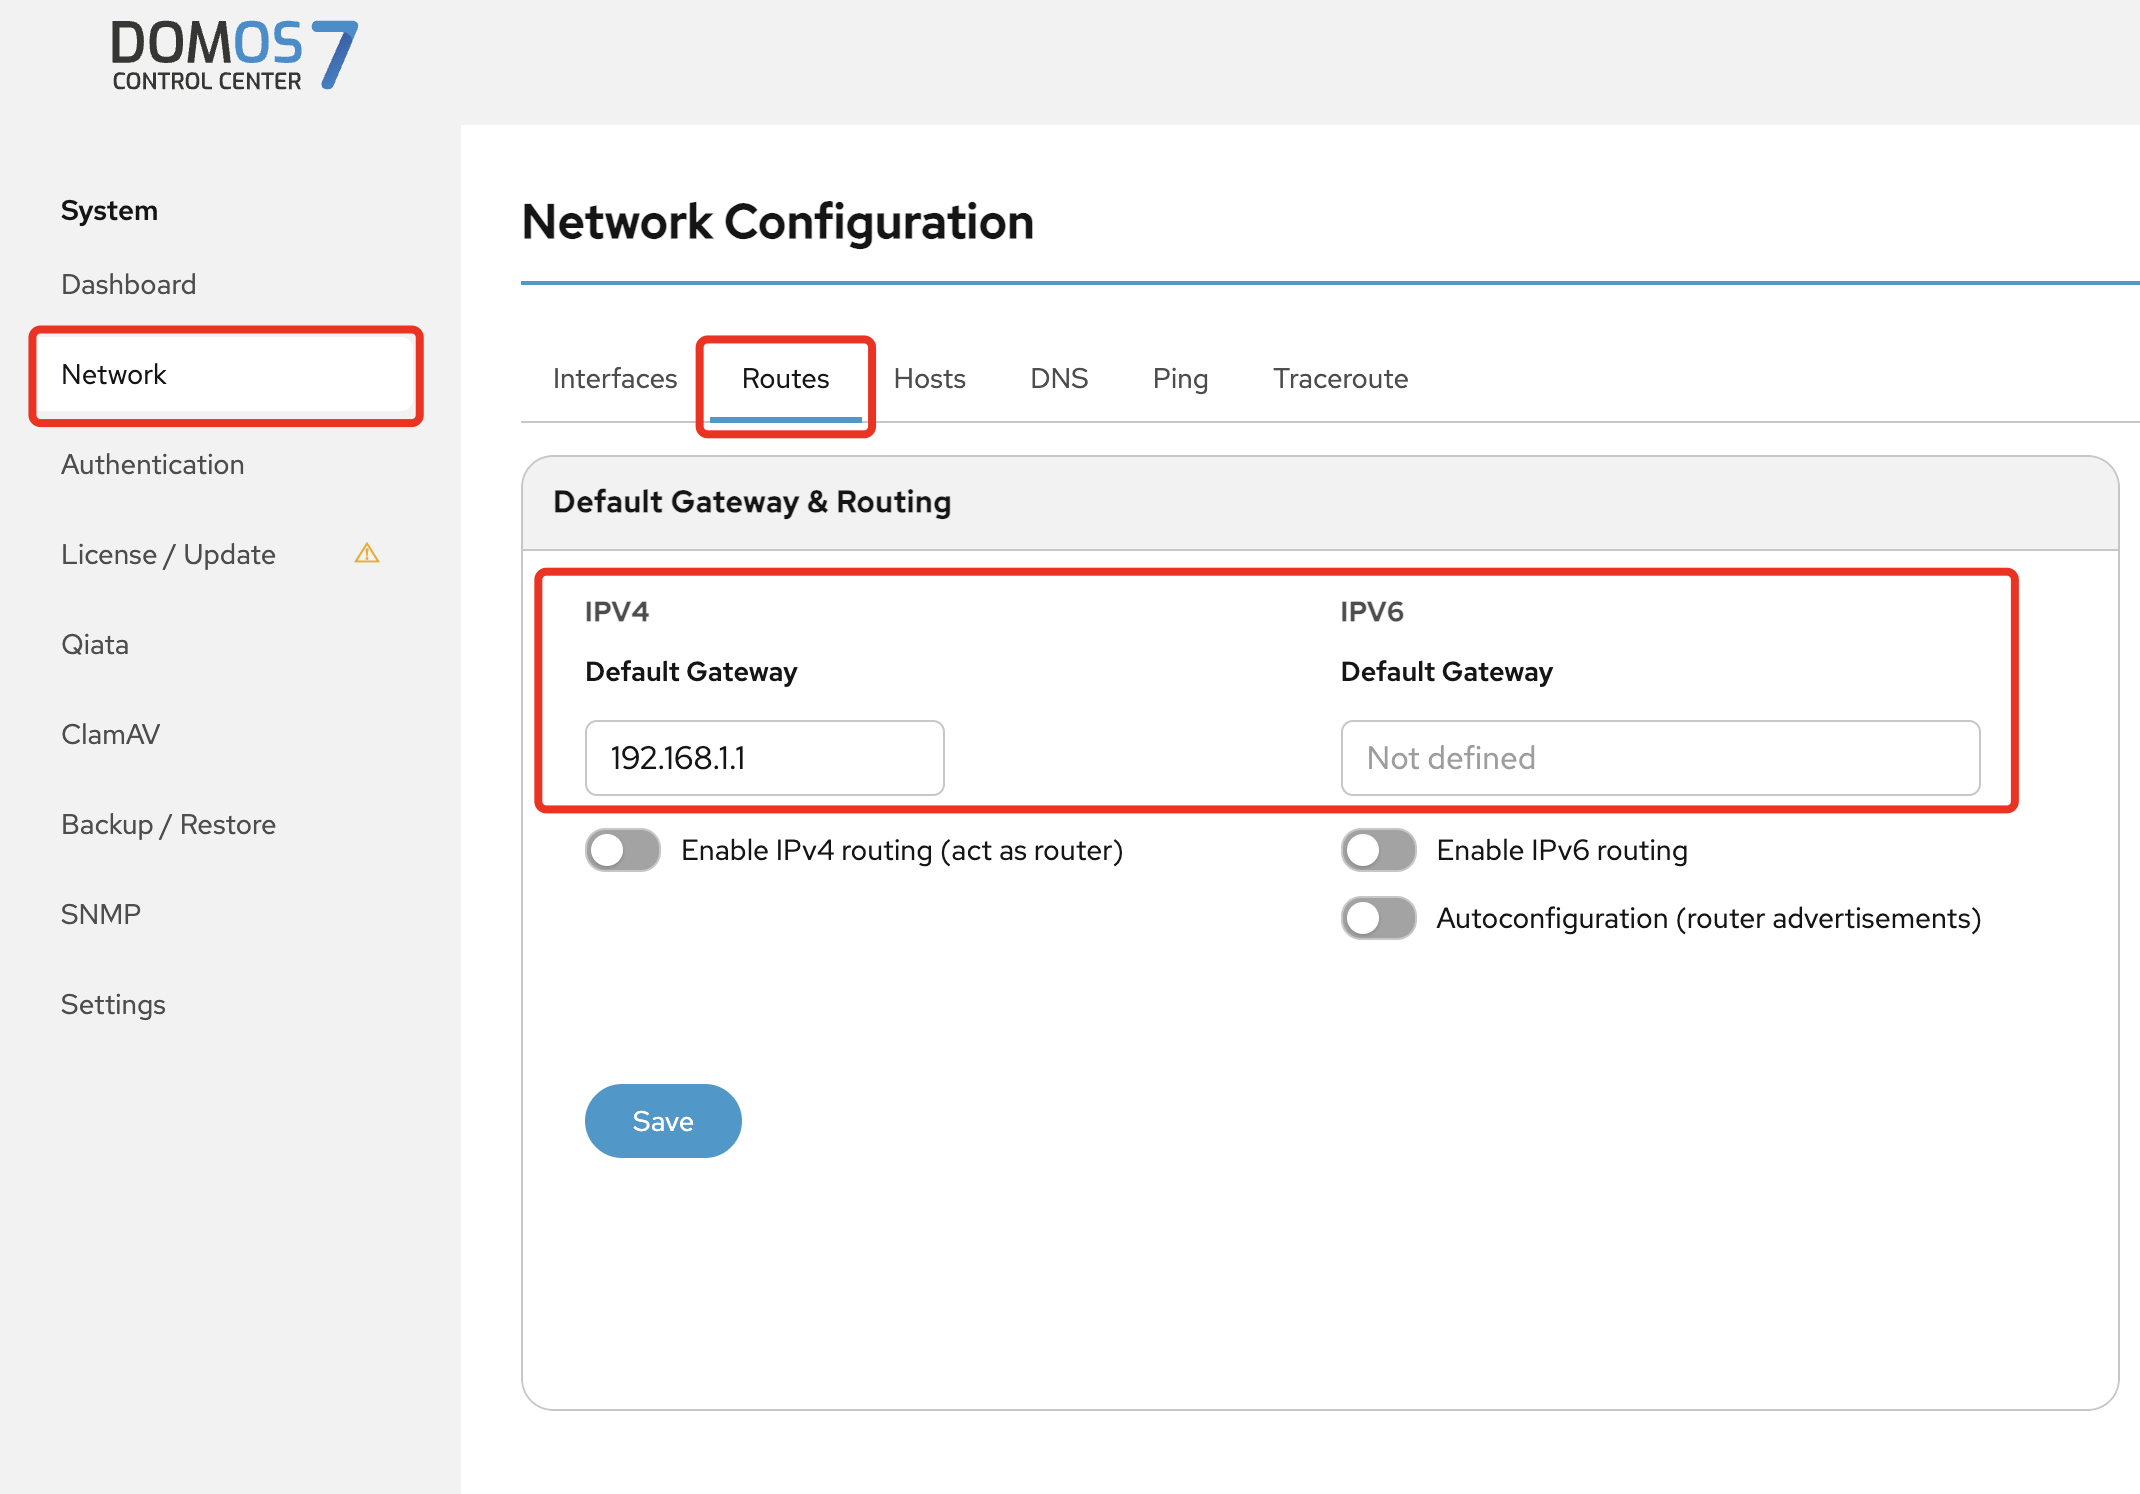
- Select "Network" → "Routes" in the navigation bar.
- Add (or change) the Default Gateway
- Click on Save
A default gateway is required for proper operation of the meloki system.
Configure DNS Server
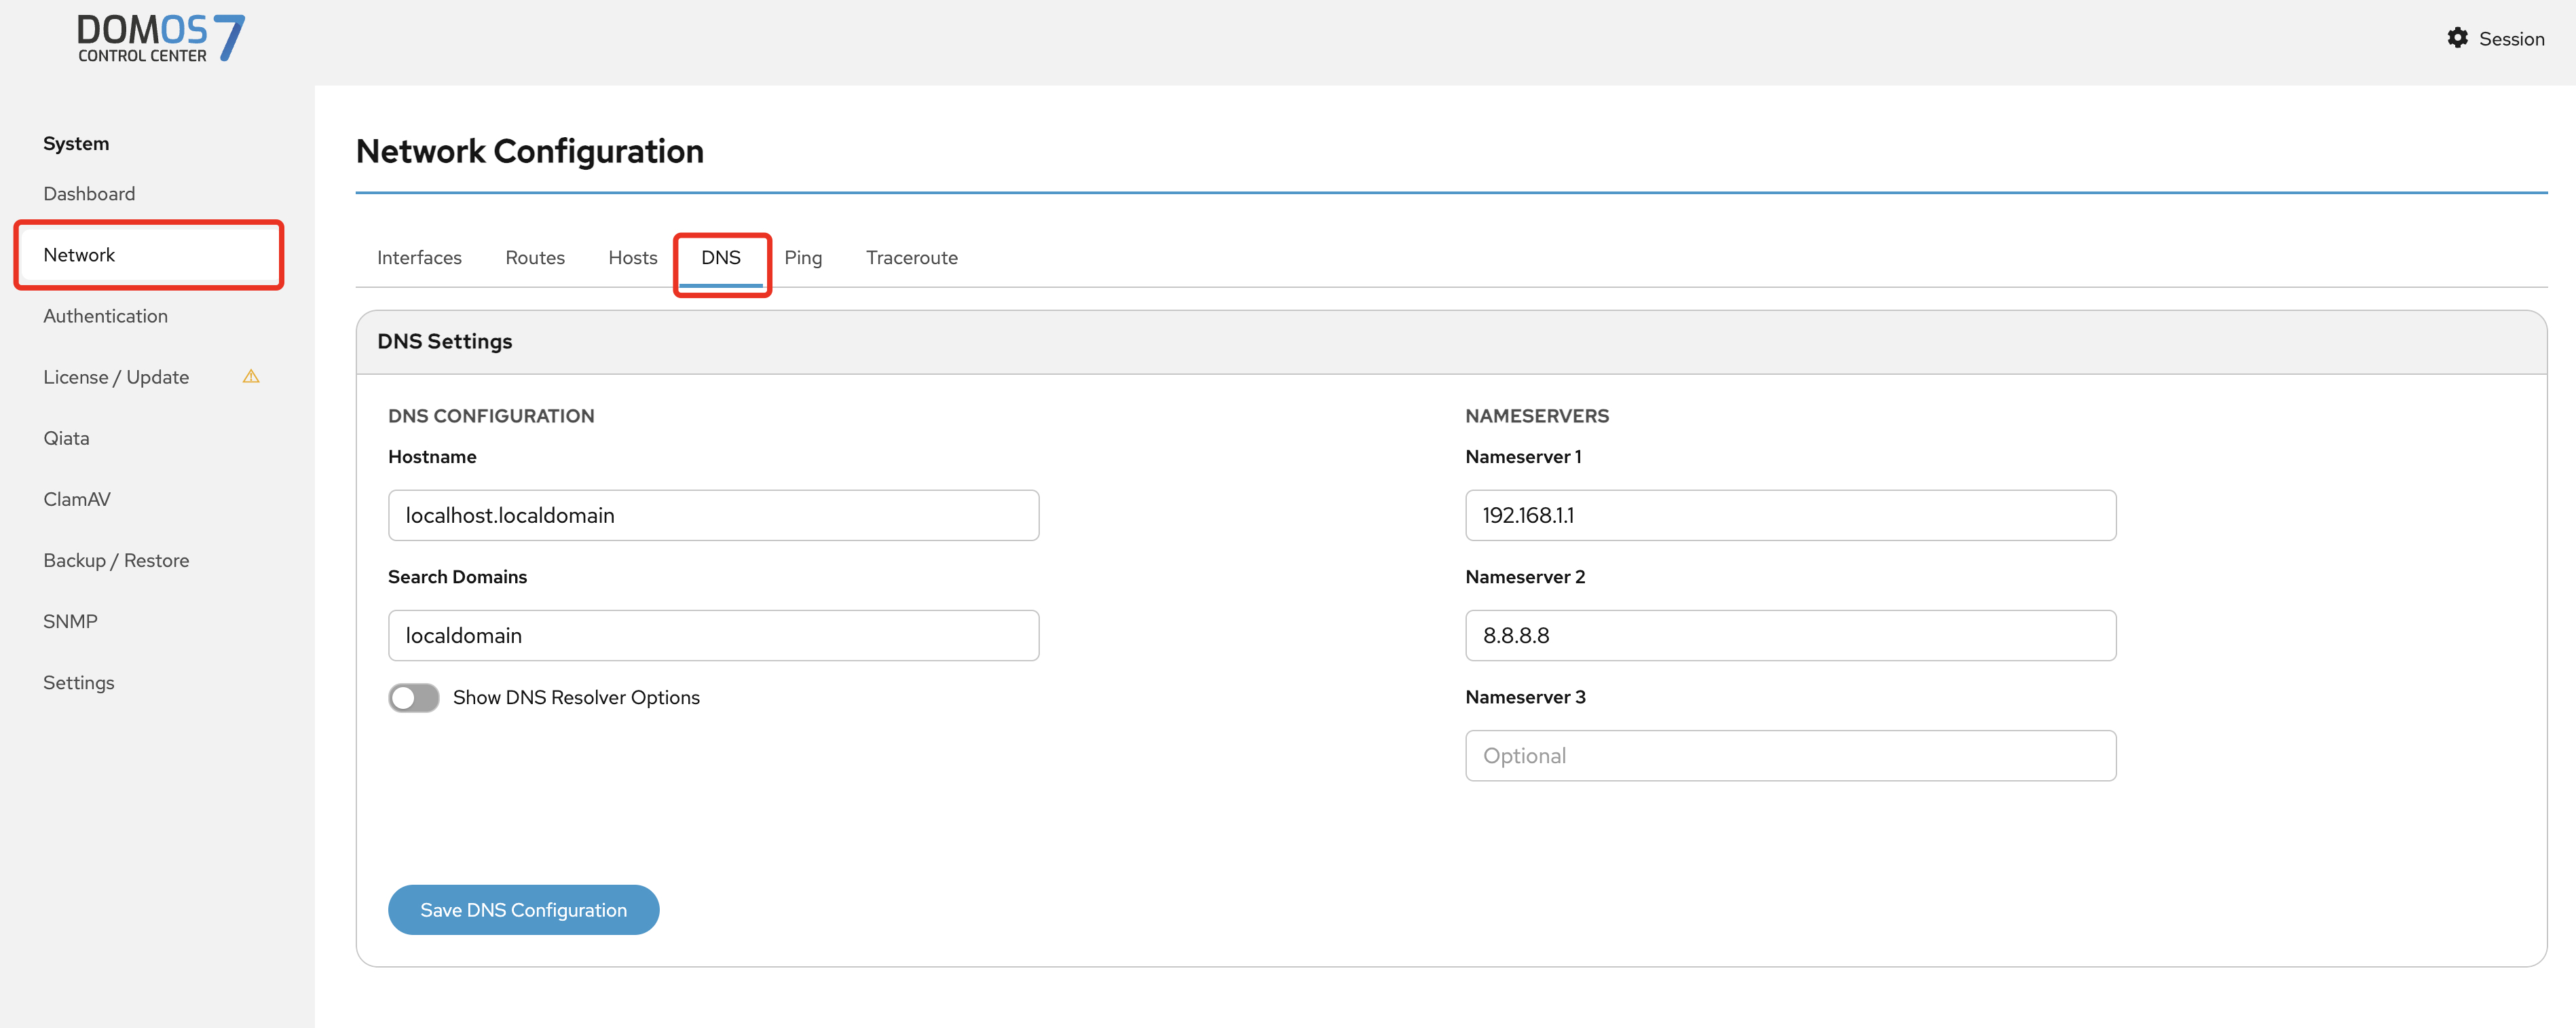
- Configure DNS server under "Network" → "DNS". [OPTIONAL]
Click on the "Activate Settings" button at the top to activate the current settings.
Applying the settings may take a few minutes. Please do not make any changes during this time and keep your browser open.

First Setup wizard
Initial Setup Wizard
Open the meloki Setup Wizard by navigating to the following URL:
https://YOUR-APPLIANCE-IP/
The wizard will guide you through the required configuration steps. All settings can be changed at any time later.
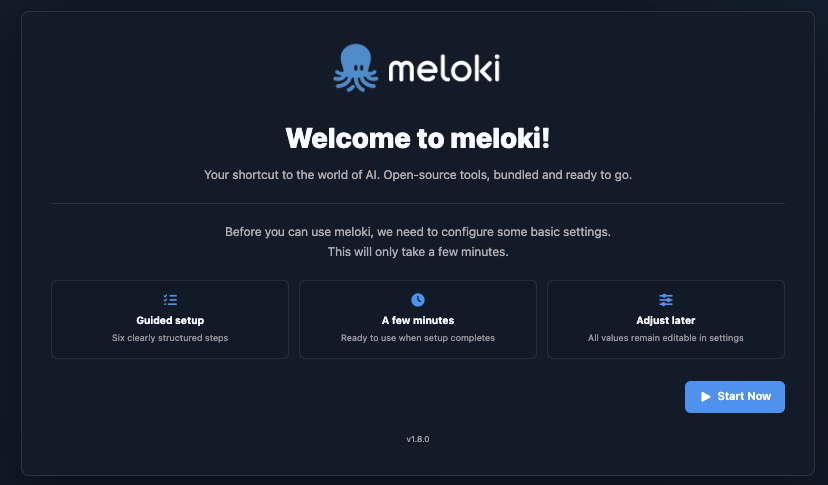
Click "Start Now" to launch the wizard.
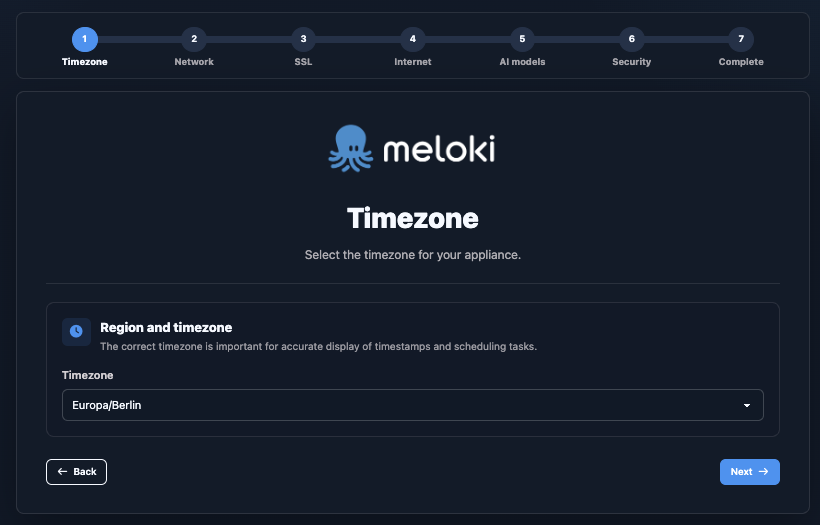
Select the appropriate time zone for your location.
Then click "Next".
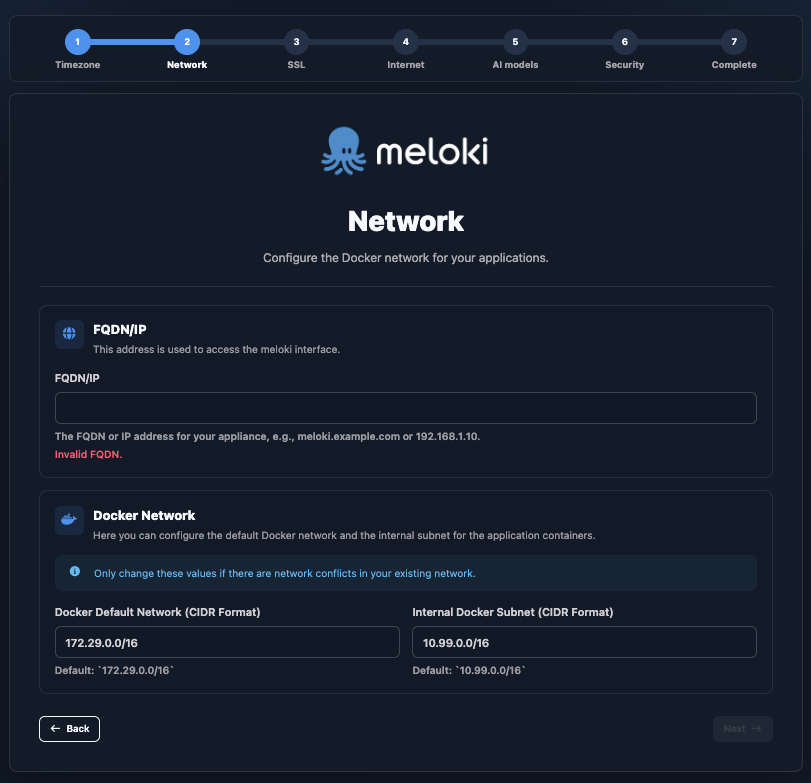
Enter the FQDN or IP address of your meloki system.
The default values for the Docker network are suggested automatically.
If they conflict with existing networks, you can adjust them accordingly.
Then click "Next".
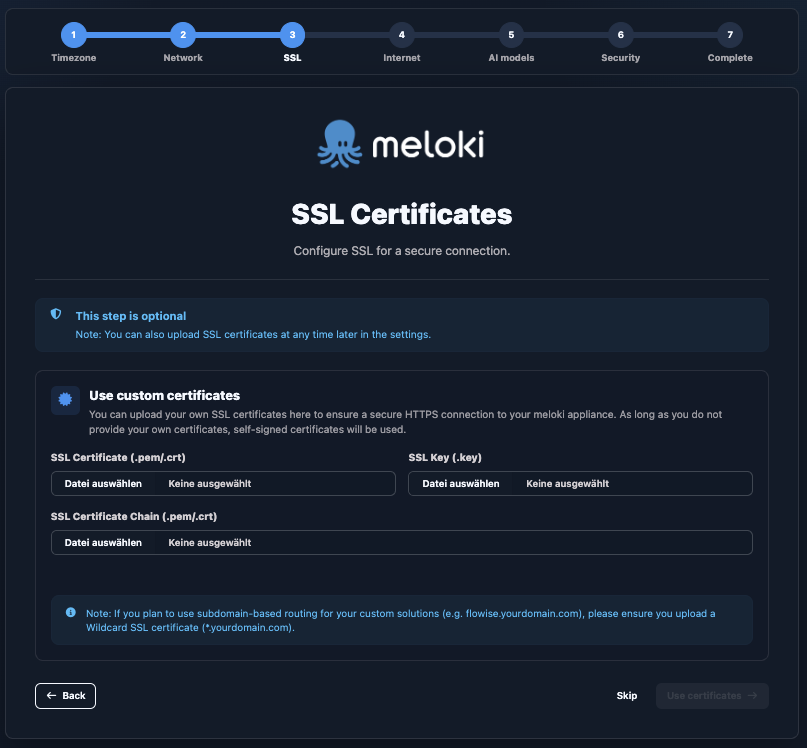
The SSL certificates are used for the meloki and Chat & RAG web interfaces.
The following files are required:
- SSL Certificate
- SSL Private Key
We also recommend installing the SSL Certificate Chain.
After selecting all certificate files, click "Upload Certificates".
Then click "Next".
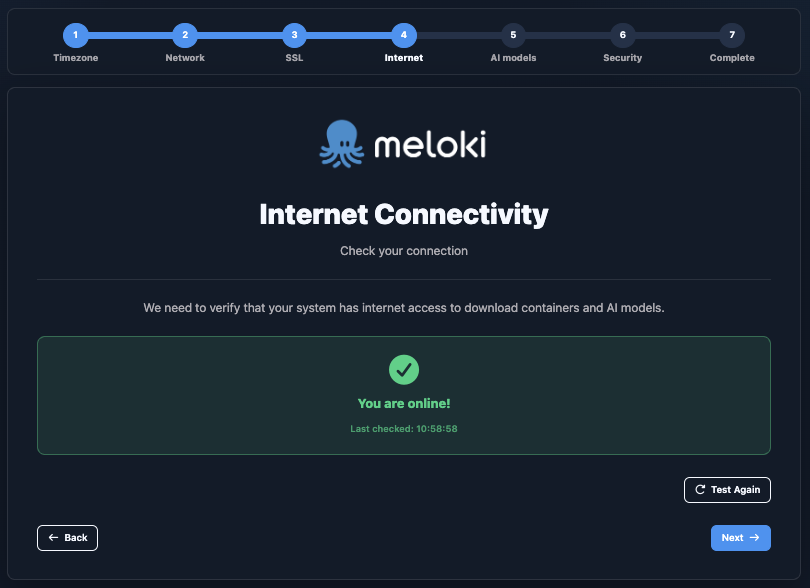
An Internet connection is required for the initial system setup. It is used to download the required containers and AI models.
Once all downloads have been completed, an Internet connection is no longer required for normal operation. Only future updates will require Internet access again.
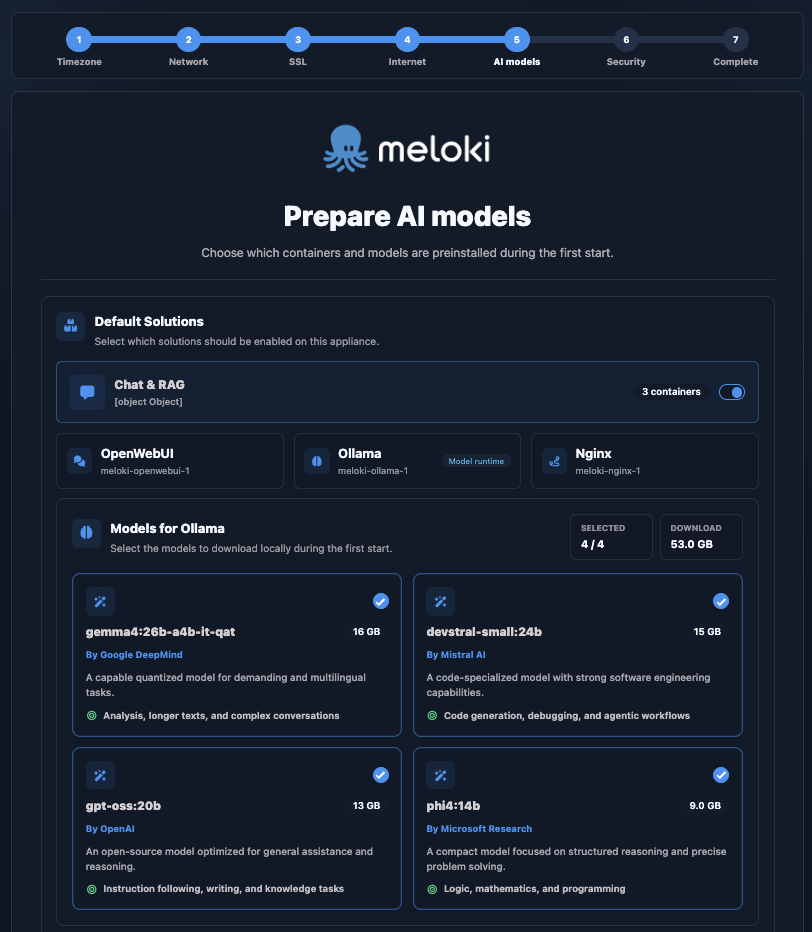
On this page, you can preselect the AI models that will be available for use with meloki.
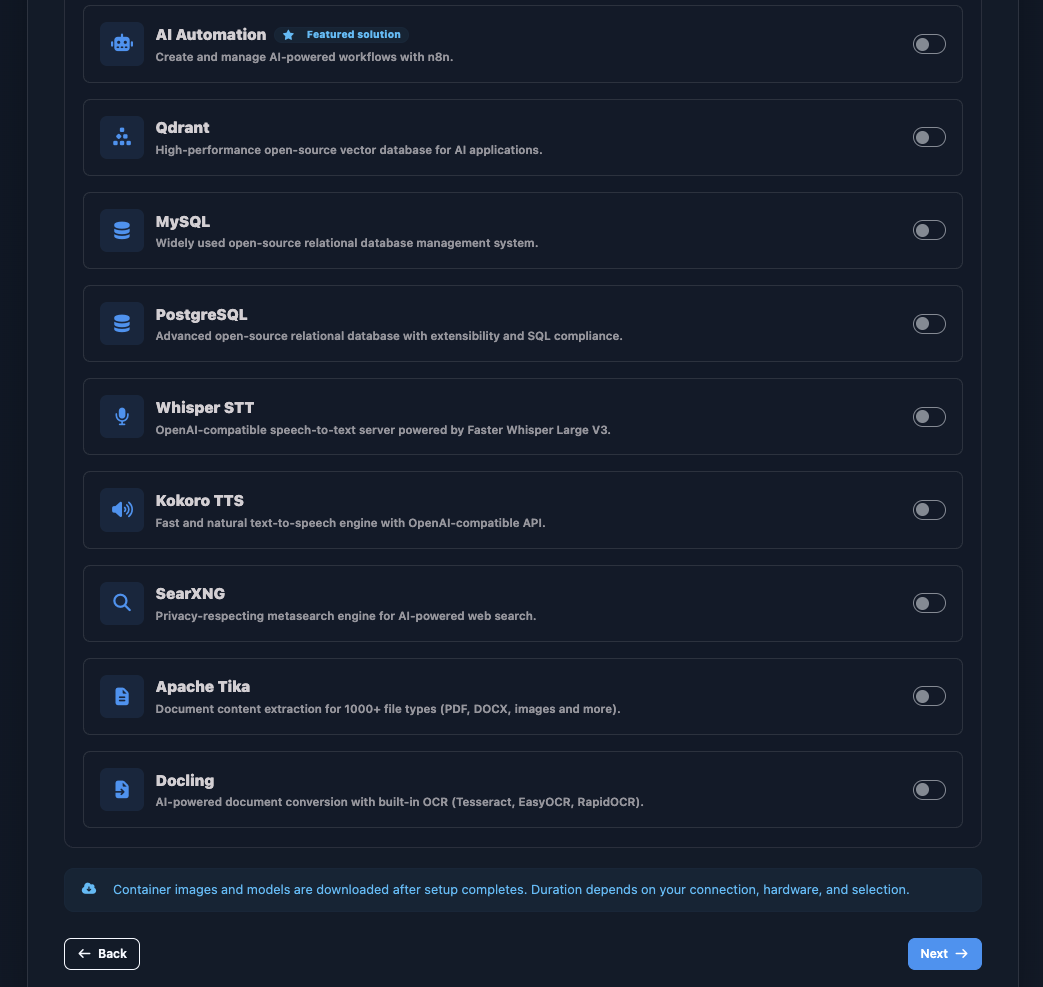
Further down the page, you can also select additional containers to be initialized during the setup process.
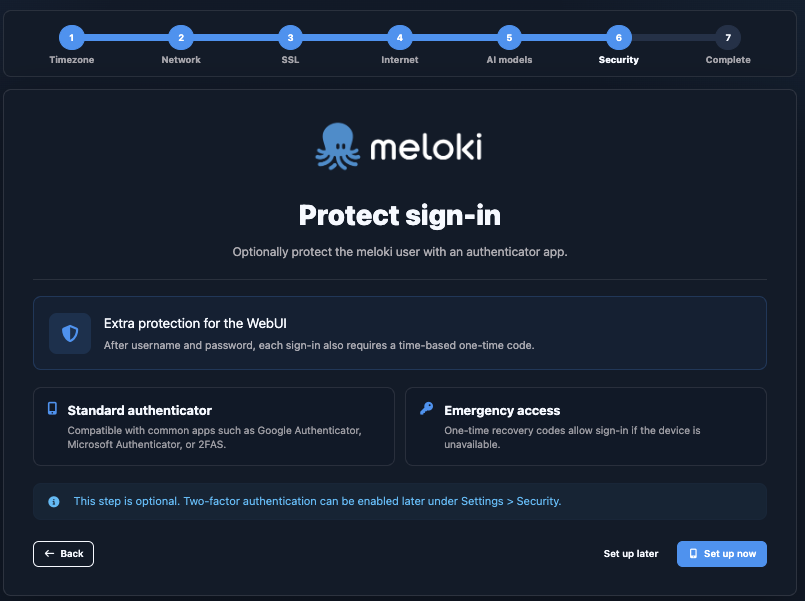
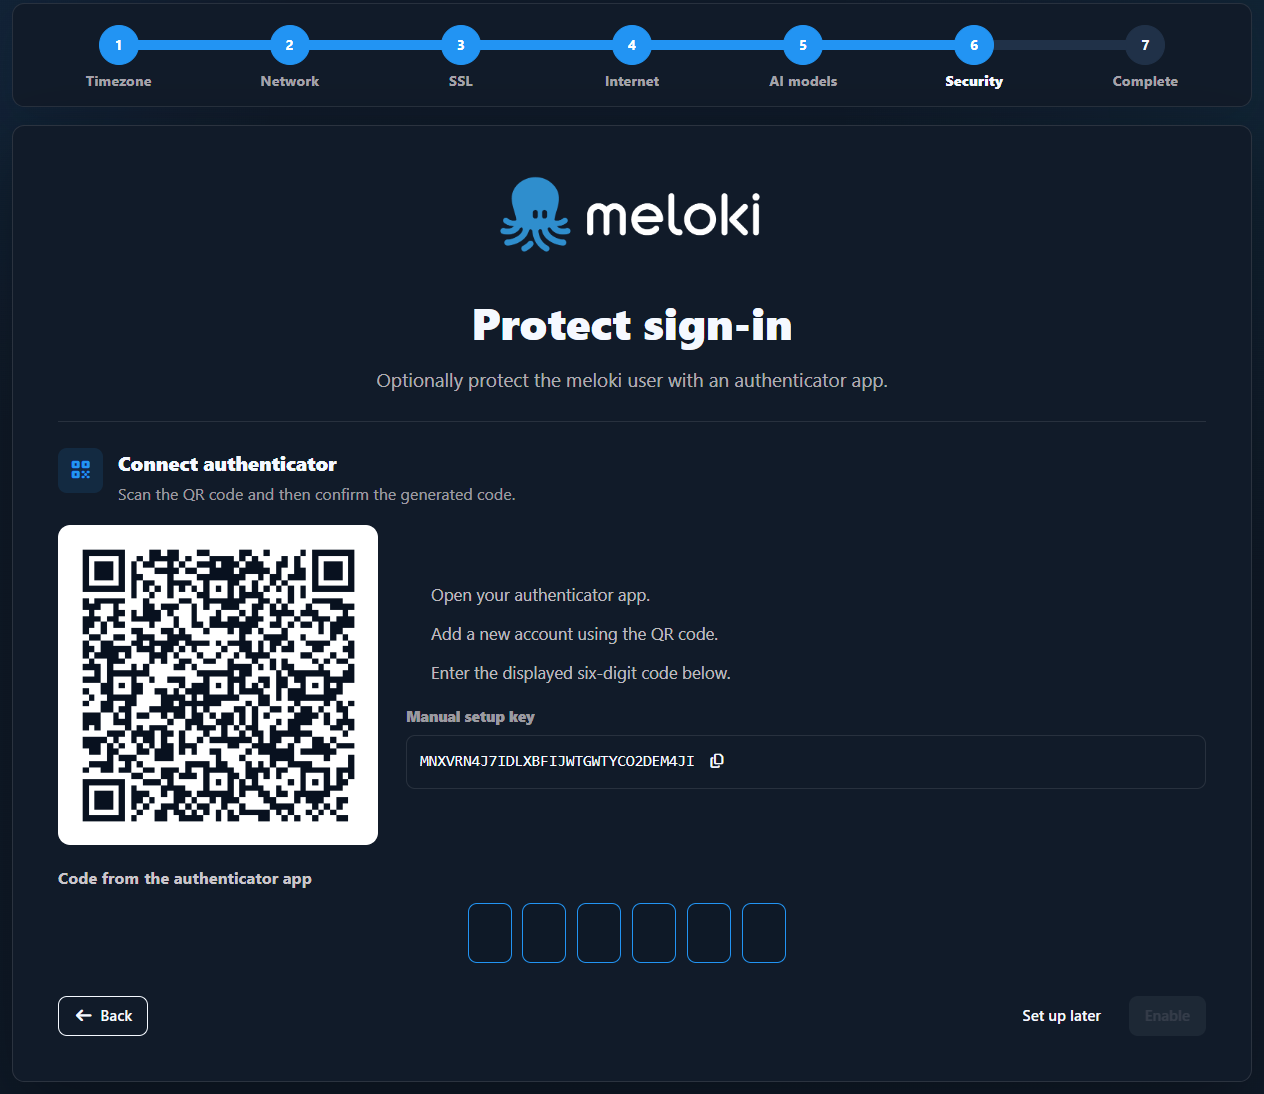
Secure your meloki installation by configuring multi-factor authentication. You can either link an authenticator app or use the provided setup key to enable two-factor authentication (2FA).
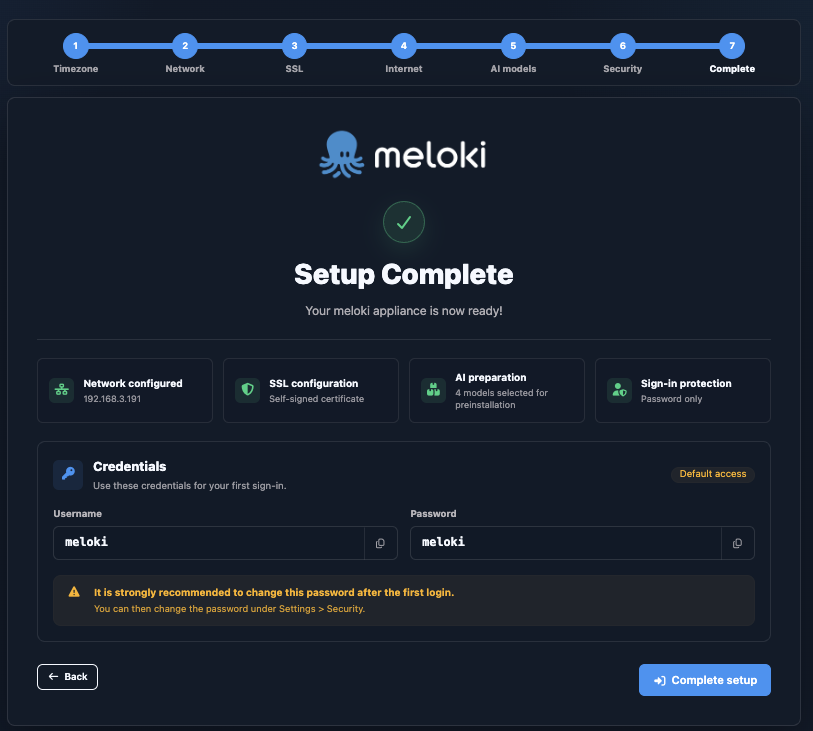
This is the final page of the setup wizard. The installation is now almost complete.
Make sure to note the default login credentials.
Click "Finish Setup".
It is strongly recommended to change the default password immediately after your first login.
The system will now complete the initialization process. After a short time, you will be redirected automatically to the login page.
At this stage, the meloki Admin Panel is only accessible via the /meloki path.
meloki Admin Panel
Authentication is required to access the Admin Panel.
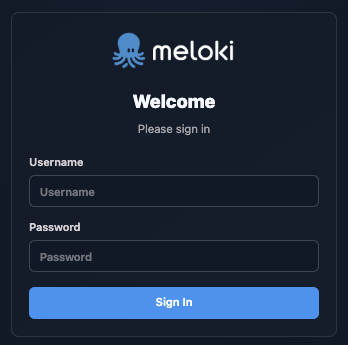
Sign in using the following default credentials:
Username: meloki
Password: meloki