Quick Start Guide OpenWrt
Before you begin, it is crucial to read and follow all safety instructions. Ensuring your safety and the proper operation of this equipment is our top priority. Please take a moment to familiarize yourself with the safety guidelines provided. Your adherence to these instructions will help prevent accidents and ensure a smooth and efficient setup.
How to connect to the appliance
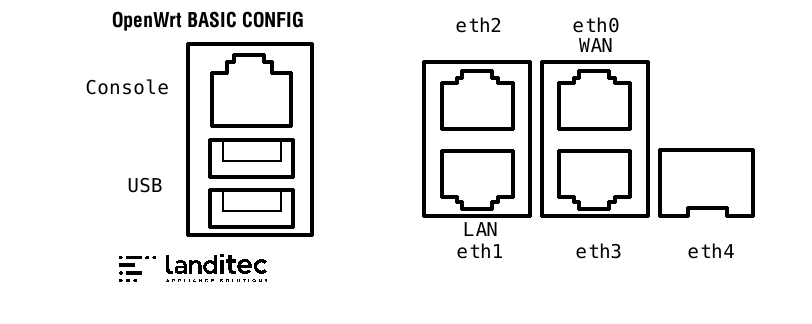
To simplify initial access for customers, we configure the interfaces for LAN and WAN.
Access is not restricted with a password:
| Username | Password |
|---|---|
| root |
Access Web interface
- By default we configure the second Port port 2 with this IP
192.168.1.1/24. We have enabled the DHCP service on this interface. - Connect your computer with the interface.
- Configure your computer either with DHCP or select an IP like
192.168.1.10 - Access the Web Interface by pointing your browser to
https://192.168.1.1.
Serial console
If for some reason, you cannot use ethernet to connect to the Web interface, you can create a serial connection with a terminal programm.
Configure your terminal programm to use the following settings:
| Speed | 115200bps |
|---|---|
| Parity | None |
| Data | 8 |
| Stopbits | 1 |
These settings are often predefined as 115200, 8N1.
SDR – Secure Disaster Recovery
SDR (Secure Disaster Recovery) lets you restore a system to its factory state quickly and reliably. Recovery runs fully automated using the included SDR stick.
Requirements
- SDR stick (included)
- Physical access to the device
Recovery steps
- Power off the device.
- Insert the SDR stick.
- Plug the stick into any available USB port.
- Power on the device.
- On most appliances the recovery process starts automatically.
- If it is not starting automatically, press F7 to get a bootmenu via serial console. Then select the stick as bootdevice.
- No additional input required.
Process
- The entire procedure takes a few minutes.
- The device may restart several times during installation.
- Once complete, the LED on the appliance will stay on continuously.
Notes
- All existing data on the device will be erased.
- After recovery, the system is in its original factory state.
- The stick can be removed and reused.
Further Documentation
For general technical information about the system environment, see: https://openwrt.org/docs/start
Hardware specific information
scope7-1610
The following images shows the interface locations after installation: